Windows Server 2016 Installation Guide
This article will outline a step-by-step guide through installing Windows Server 2016
INSTALLATION GUIDE
admin
3/9/20233 min read


Windows Server 2016 is a popular operating system designed for servers and data centers. It offers a range of features and improvements over previous versions, such as enhanced security, improved virtualization support, and better scalability. In this article, we'll walk you through the process of installing Windows Server 2016 step by step.
Before we begin, there are a few things you'll need to get started:
A computer with a 64-bit processor that supports virtualization and at least 512 MB of RAM.
A DVD or USB drive with the Windows Server 2016 installation media.
A valid product key for Windows Server 2016.
With these requirements met, let's get started.
Step 1: Boot from the installation media
Insert the DVD or USB drive with the Windows Server 2016 installation media into your computer and restart your system. When your computer boots up, enter the BIOS and make sure that your system is set to boot from the installation media. Save your changes and exit the BIOS.
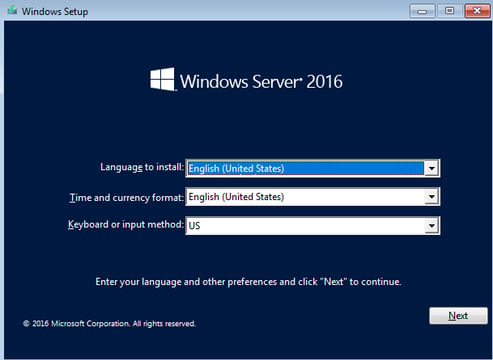
Step 2: Choose the language, time and currency format, and keyboard or input method
After booting from the installation media, you'll be asked to choose your language, time and currency format, and keyboard or input method. Make the appropriate selections and click "Next" to continue.
Step 3: Install now
On the next screen, click "Install now" to begin the installation process.
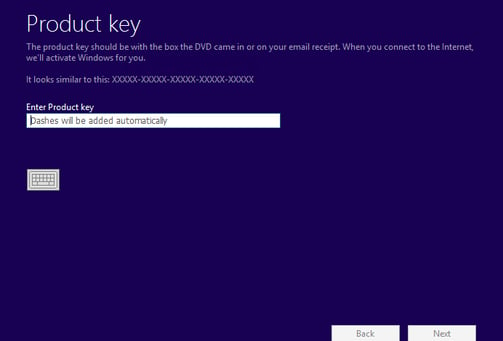
Step 4: Enter the product key
Enter your product key for Windows Server 2016 and click "Next" to continue. If you don't have a product key, you can still proceed with the installation, but you'll need to activate Windows Server 2016 within a certain period of time after installation.
Step 5: Accept the license terms
Read the license terms carefully and accept them by checking the box next to "I accept the license terms." Click "Next" to continue.
Step 6: Choose the installation type
On the next screen, you'll be asked to choose the installation type. You can choose between two options: "Custom: Install Windows only (advanced)" and "Upgrade: Install Windows and keep files, settings, and applications." Choose the option that's appropriate for your needs and click "Next" to continue.
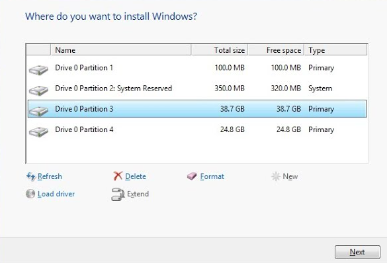
Step 7: Select the disk partition
On the next screen, you'll be asked to select the disk partition where you want to install Windows Server 2016. If you have multiple partitions, make sure to choose the partition where you want to install the operating system. If you need to create a new partition, you can do so by clicking "New." After making your selection, click "Next" to continue.
Step 8: Wait for the installation to complete
Windows Server 2016 will now begin the installation process. This can take anywhere from a few minutes to over an hour, depending on your system's hardware and the size of the installation files. Make sure not to turn off your computer or interrupt the installation process during this time.
Step 9: Configure the server
After the installation is complete, Windows Server 2016 will reboot your computer. When your system restarts, you'll be prompted to configure the server. Follow the on-screen instructions to set up your server, including configuring network settings, creating user accounts, and setting up security options.
Congratulations! You've now successfully installed Windows Server 2016 on your computer. From here, you can begin to explore all of the features and capabilities of this powerful operating system.


©2023
